
Okay, here we go again. In this session we've started to paint. Sounds easy enough, right? Well, what paints shall we use? Anyone out there have a tube of skin colored paint? White skin, tan skin, shadowed skin, shiny skin? No? Then I guess we have to mix our own. But first, use matte varnish and cover the whole page. I don't want the paper to curl and pucker so we'll prepare the paper with varnish and then paint on top of that. While this varnish is drying we'll mix paint.
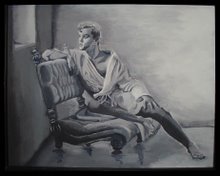
I'll talk about mixing skin color in a minute but first let's get the boring stuff out of the way, like the big shadow on the wall behind him. I like getting the background out of the way early because I'll feel better knowing I won't have to work on it later. I can focus on the fun of painting our good looking swimmer dude. I learned from a smart artist (and from making several dull paintings) that you never paint with black except for tiny little bits to serve as emphasis. The most beautiful blacks are mixed as rich, dark neutrals. True blacks completely close out the light reflecting potential and cause the painting to look flat. So, we'll mix our "black" using a warm and cool complementary color. I start with equal parts of Raw Umber (a dark warm brown) and Prussian Blue (a dark navy blue). I adjust the mixture until it I can't see a bluish or brownish tint to it. Then paint the shadows.
Now, back to the skin color. For Caucasian skin, which our guy is, we need to have a gold cast to it. Pink? NO! Trust me, if you start with pink the poor young fella will be sunburned from the get go. Take a look at most make-up foundations. The base is usually a very sickly yellowish color. Then, pinkish highlighting powders and shadows are put on to that. Think about painting our guy with those colors. Let's look at our source photo for reference. Sure enough he has a healthy golden glow to his skin. The shadows on his skin are a ruddy brown and where he's had to much sun there's just a slight pinkness. But, we usually focus on the pink in a person's skin because in color theory cool neutral colors recede and warm saturated colors advance. Therefore, the warm reds in a person's skin pop out at us.
I know that if we don't emphasize the drawing with a dark rich color the colored pencil lines will be covered up by the opaque paints. So, let's mix up a dark natural skin color, a dark, brownish maroon color (cadmium red and raw umber with a touch of white gesso). Just about the color of a bad bruise. Paint over the pencil drawing with the bruise color being as careful as you can not to lose the image. It won't be perfect because a brush won't be as accurate as a pencil. This thin maroon color will have some brush strokes in it. But, that's okay. This is underpainting. There will be several layers on top of this. You might still see a little of it when we're finished, but just barely. This is like the skeleton. You don't see a person's bones when you look at them, you just know they're there. Right?
While this dries mix the base coat for the skin. Let's not mix too yellow or we'll give him jaundice. Let's not go too red or he'll look sunburned. Start with a big dollop of cadmium yellow. Then, add just a touch of cadmium red. You'll be surprised how far a little touch of red will go. You'll make orange in a hurry with just a little bit. When you have a yellowish orange color start adding white gesso. Add a little at a time until we have a healthy light peach color. Then add a touch more white because acrylics always dry a little darker than you think. So go lighter to be on the safe side. At this point I use gesso for the white instead of titanium white because I want the easy flow of the liquid paint. Titanium white will be so thick it will cover every thing we've done. And right now we still want some translucence. Carefully, start to overpaint the maroon colored figure with the peach color. If its too opaque to see the underpainting wipe it off. You can do that if you primed the paper with varnish. Add a little water and try again. Then, base coat the swim trunks with a light pink mixed from cad red and white and paint them. When the figure is covered we're done with this session. Gee, that was exhausting let's go take a nap and dream of what he'll look like when finished.


1 comment:
Thanks for the detailed guide. I am learning a lot and understand better now why my guys always looks a bit sunburned... :)
Post a Comment