
Here's the beginning of a new piece I'll be working on. I thought it would be fun to let the readers follow along on this one. For those of you who are fellow artists, you can laugh at my mistakes. For those of you who are not artists, I hope you'll get an idea how much time and energy it takes to put a piece of artwork together. To help you get an idea of the scale we're working with, this support (Artagain Paper) is roughly 8.5X 19, in. The paper is about the thickness of poster board (a little thinner) with a light texture to it. This particular paper is a light ash gray. I know this particular dimension is a little strange. However, I'm basically working on a piece of scrap here.
Now, we have the potential for a lot of mistakes, because I'm gonna be practicing new techniques. My last artwork, "Blue Towel," was pretty basic traditional colored pencil technique. But, as with anything, if you want to improve you have to practice. You have to try new things. So that's what I'm doing here. I found an artist's website that executed the most beautiful figurative work using a combo of acrylic paint washes and Prismacolor pencils. He even has a page on his website that describes his process. His finished works have an almost airbrushed delicate quality to them. But, he stresses that there is only hand drawn pencil work on the artwork. Since acrylic and colored pencil are the two media that I work with primarily, and I love figurative subjects, I thought I'd try it out.
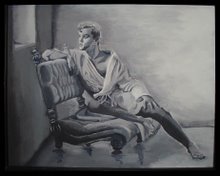
This is not the most imaginative or original subject, I realize. But, since I'm trying something new I didn't want to deal with a complicated pose or a lot of wrinkled, flowing, billowing drapery on the figure. So, we'll stick with something simple, a straight forward athletic figure in full sunlight lit from the upper right. I also had this "scrap" of gray paper I wanted to use. Because of it's dimensions I needed an upright standing pose. This one just happened to fit perfectly.
Although we're just at the very beginning of the drawing, there has been a lot of work that has gone on already. I've worked about three or four hours off and on to get to this stage. Let's keep track of the time on this one so I can charge by the hour plus the cost of materials like a building contractor. So far, I've copied the source photo in black and white (you can see values better in black and white) and in color. I decided what part of the photo to use. There is a lot of empty, unimaginative background in the original that we're not going to use. But, there's a contrasting shadow being cast on the wall behind our guy that will lend some interest to the work.
Since this support is a little flimsy, and we're going to be using a little bit of wet media on it, I've taped it down with masking tape on a foamboard backing. I've tested the paper's reaction to getting wet. It puckers a little but smooths out again when dry. I hit it with the blow dryer for about 2 minutes and it was right back to flat. We won't be drawing on it when its wet anyway. And the piece I tested wasn't taped to a backing. We should be in good shape here. I think matte board would be a better choice but I don't have any. If we do this again we'll get the matte board (but have to charge more for the drawing because matte board is more expensive).
After that, it was a simple matter of enlarging the subject to fit the paper. For those of you who are not artists that might not sound so simple. But, trust me, it just takes a little practice. I checked and double checked my proportions and angles. Then did almost an hour's worth of clean up with a kneaded eraser and drafting cleanup bag. I've done all that just to have created the equivalent of a coloring book page. The next step will be a little heartbreaking. All of these dark graphite lines have to be replaced (therefore erased) with a more subtle, neutral Prismacolor line. I'm expecting another two or three hours for that part. Did you notice I didn't work in a lot of detail on the face? He looks a little comic bookish, right? Its because I didn't want to have a lot of eraser marks and roughed up paper on the face. I just drew in the landmarks, I'll detail the face in color. Then, after all that, we finally get to add just a little, and I mean a very little, bit of paint.
Hope you didn't think this would go quickly. It might be almost as interesting as watching paint dry.


No comments:
Post a Comment